Around the holidays EVERYONE is crafting. Do you want to but feel like you suck at all DIY’s well this is definitely where you need to be then !! You can do this & I’m about to explain it so dummy proof you will be excited.
Fabric glue is the devil y’all! I have never found one that doesn’t take all day to dry not to mention the sticky mess i always create with it sorry i just hate it! So in my tutorials you will only find the amazing glue gun !
When I want to learn anything new i always go to pinterest to find me a great tutorial which i sometimes struggle with because i need 100% beginner steps when learning ! So hopefully that’s what i will provide here. Let’s get started !!
Materials Needed:
- Glue gun with glue sticks
- Felt
- Scissors
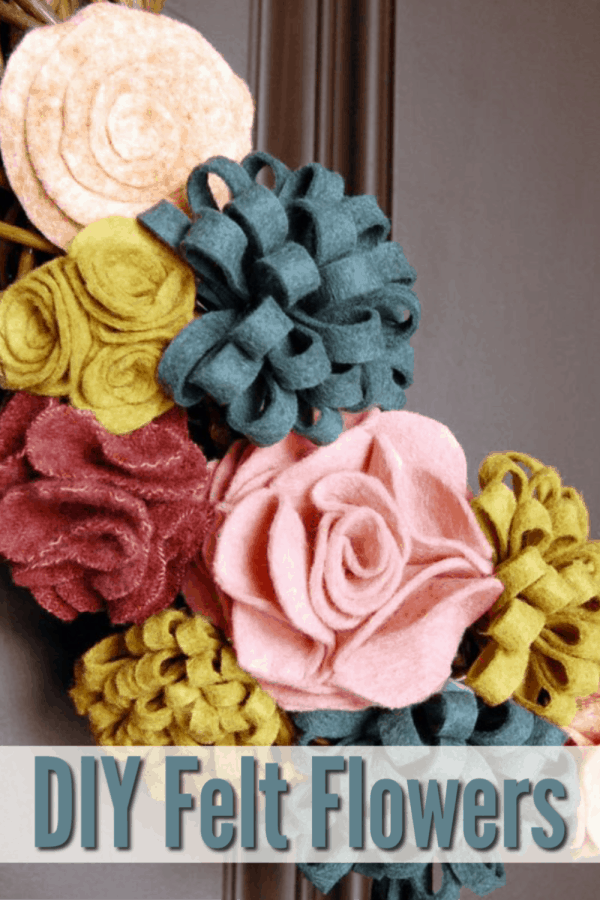
The first flower we will be doing is what i call the “fringe flower”. All steps with be listed and will follow with pictures for each step.
1. Cut out a long rectangular shape you can make any size you like bigger across bigger the flower.
2. Lay down the felt flat put a thin line of hot glue on the outside edge fold in 1/2 and put a little pressure so the glue is secure.
3. Start cutting at the end making cuts on the closed side of the felt the further you go down to the glued part the better it will give you less bulk at the end.
4. Keep cutting your notches until you’re at the end.
5. I then lay flat and put a little hot glue to start rolling it up. As I’m rolling it to the end i also put hot glue about every inch or so just makes it easier and more sturdy.
6. When you have rolled to the end simply fluff your flowers and your done !!!
I will be putting these on pic frames, scarfs, headbands etc..


Next flower is what i call “Curly Q”.
1. Cut a felt square.
2. Round it’s edges all four.
3. Start cutting into the felt in a circle direction you do not have to be picky or uniform.
4. When you have cut around all the way to the end you will have a little round piece left what i call the tail just leave it and then you can hot glue that to the bottom of your flower when your done.
5. Then roll the felt up from end to inside using your thumb and pointer finger is the easiest ! And as your rolling put little dots of hot glue it keeps it from falling apart.
6. Now your at the end glue the end piece in place and trun it over now that little circle tail you had left at the end when cutting now can be glued to the bottom of the flower for a base.


Yall please try this and then show me pictures! If you have any questions please ask i will answer quickly.
LC
XOXO
•○•°•°○●•○°●
so cute!!!
Those are great flowers!!
They would look beautiful on a wreath.
And I’m with ya on the craft glue… sticks to everything and makes a mess!
Those are all cute flowers! I have been trying to figure out how to make fabric flowers with burlap — I have seen a few tutorials, but I just can’t get the hang of it ha ha!
Oh my goodness, these are so cute. They would look fabulous on a barrette or a headband too!
Thanks for sharing (and for linking up to the #SHINEbloghop)!
Wishing you a lovely week.
xoxo
Oh my! They look incredible! Pinned and tweeted. We always love partying with you, I hope to see you Monday at 7 pm at our party. Happy Saturday! Lou Lou Girls
These are just great! thanks for the great ideas
Those flowers turned out great! Love the color combos for your wreath!
These are all so pretty! Thanks for sharing!
Beautiful project.
This is such a fantastic tutorial – I can’t wait to try it. Thank you so much for sharing! I hope you’ll come back again this week for Awesome Life Friday!
Your flowers are fantastic and your wreath is beautiful. Thanks for linking up to Scraptastic Saturdays.
I’ve been wanting to learn how to make these. This might just push me over the edge to try it! Thanks for sharing!
How fun, my girls will love this!
These are so pretty!! Thanks for sharing at the cook-it-craft-it-share-it link party!
These felt flowers are really cute 🙂 My fave is the fringe flower!
Thank you for linking up on the Talented Tuesday Link Party! I hope you join us again this week 🙂
these are super cute and look pretty simple to make…right up my ally! Pinned! Thanks for linking to Tips & Tricks! Can’t wait to see what you link up next! 🙂
Thanks so much !!
Super creative. I love these and can’t believe how well they turned out! WELL DONE! <3
Thanks !!!