We all know Pinterest loves long images, right? Right. So, how do you create long images without distorting them? Make a collage, of course! I’m going to show you how to do just that, using PicMonkey. Don’t be intimidated: even with no design experience, you’ll be a collage making pro in no time.
1.
Choose the post you’re going to work on. Save all images from that post, then head over to PicMonkey. I chose my Margarita Lime Tequila Cookies.
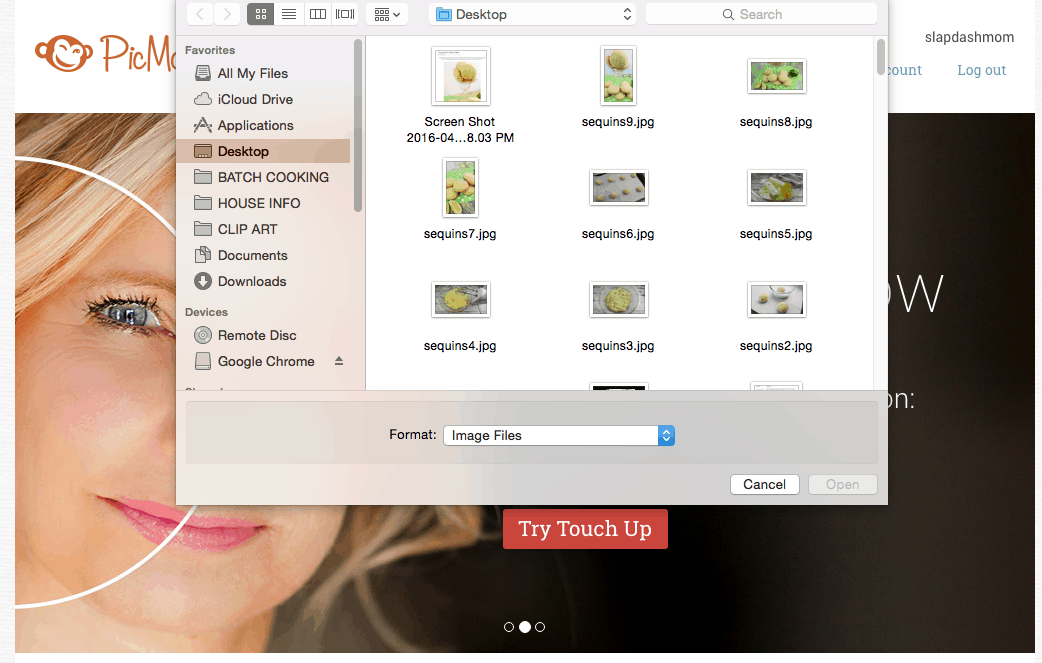
2. Choose “collage”, then select the images you just saved. To select more than one image at a time, hold down CTRL (or CMD on a Mac).
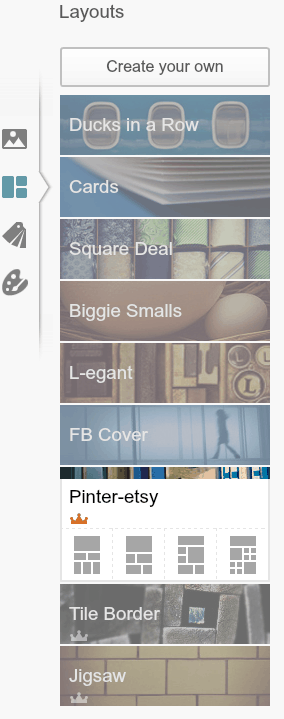
3. On the left hand side, you’ll see collage options. Click “Pinter-esty”.
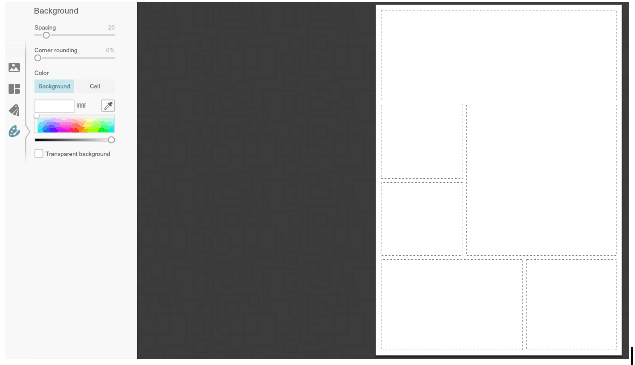
4. Then, click on the little paint palette. Drag the “spacing” bar to where the images aren’t going to be so far apart from each other. Leave the background white. This creates a more sleek look.
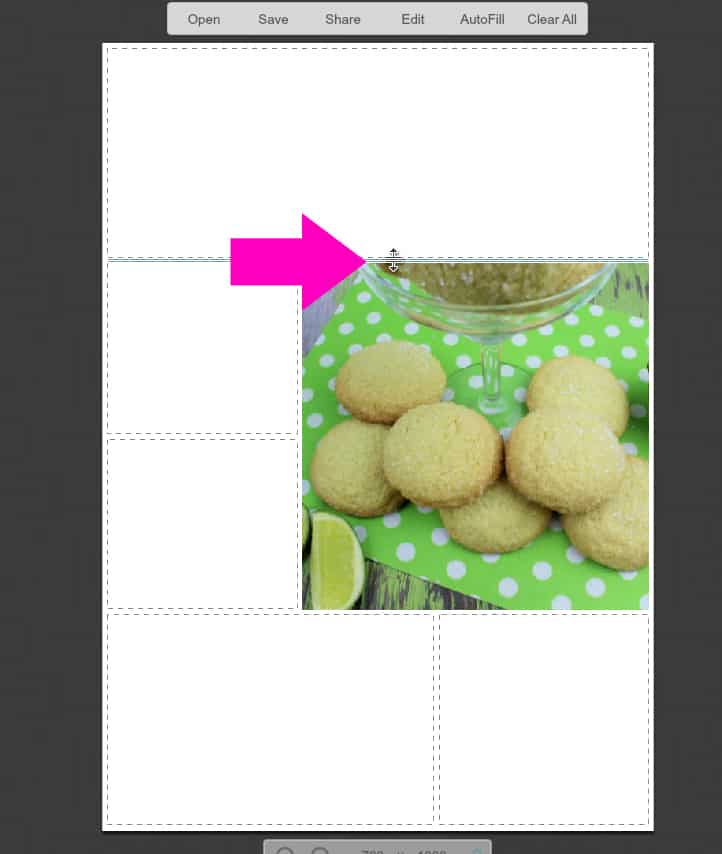
5. Adjust the boxes as you see fit, using the tool the arrow is pointing to in the image above. Sometimes this takes a little while: you’ll need to see which images look good next to each other, which images you really want to use, and which ones you don’t need.
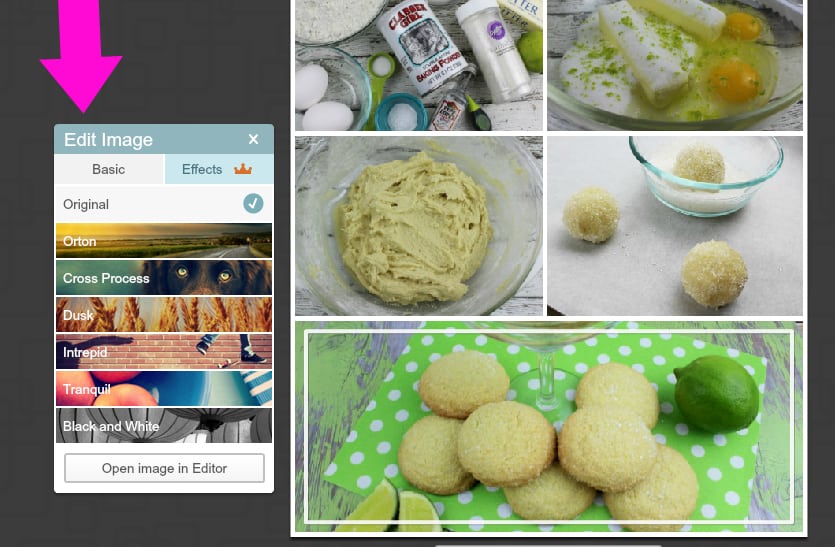
6. To edit individual images in your collage, click the “edit” button (pops up on hover). You can use basic edits, use effects, or click “open image in editor”.
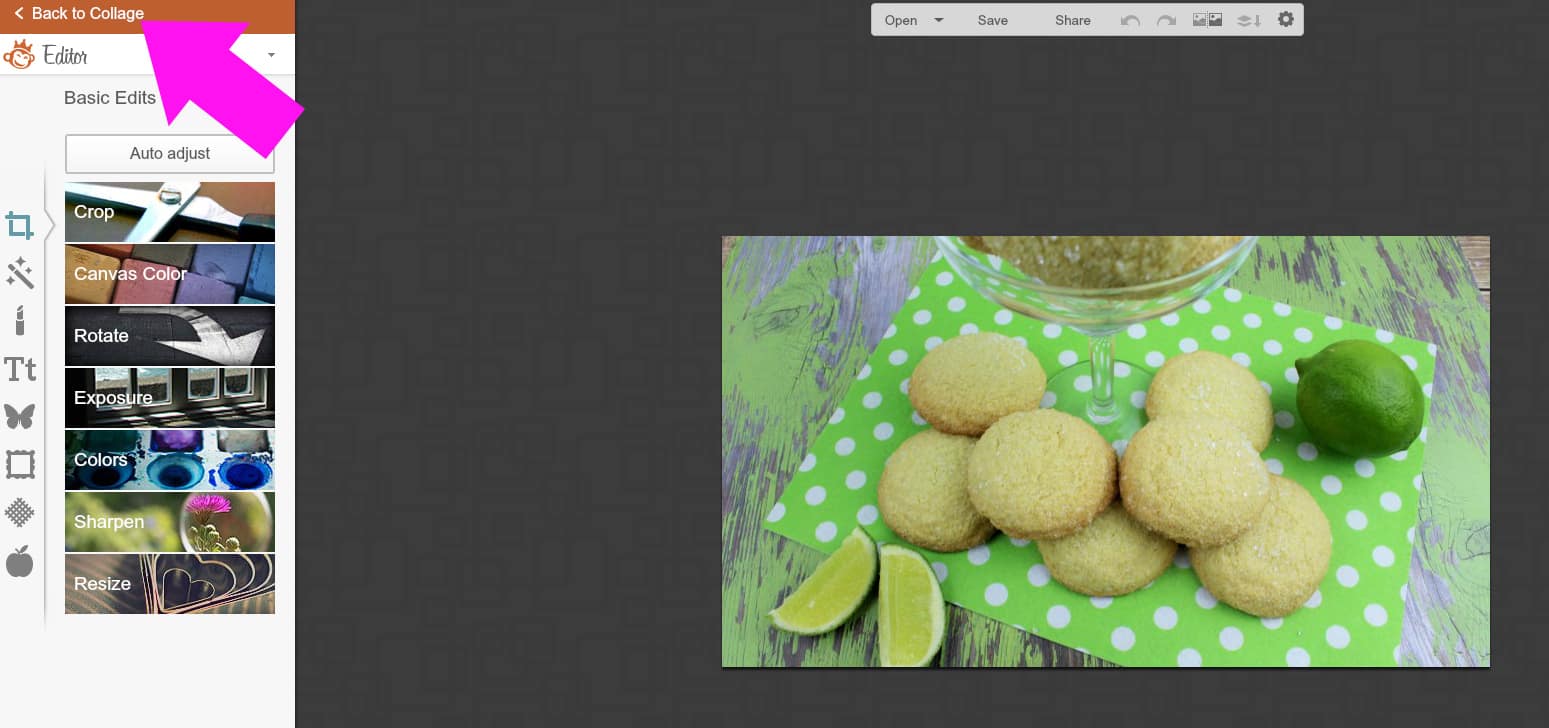
7. Once you’ve finished editing the image, click “back to collage”.
Here, you can see the edited image in the collage. This is a newer feature on PicMonkey, so I’m super excited about it! You’ll need to have the “Royale” subscription to access many of these features. It’s just a few bucks each month, so it’s definitely worth it.
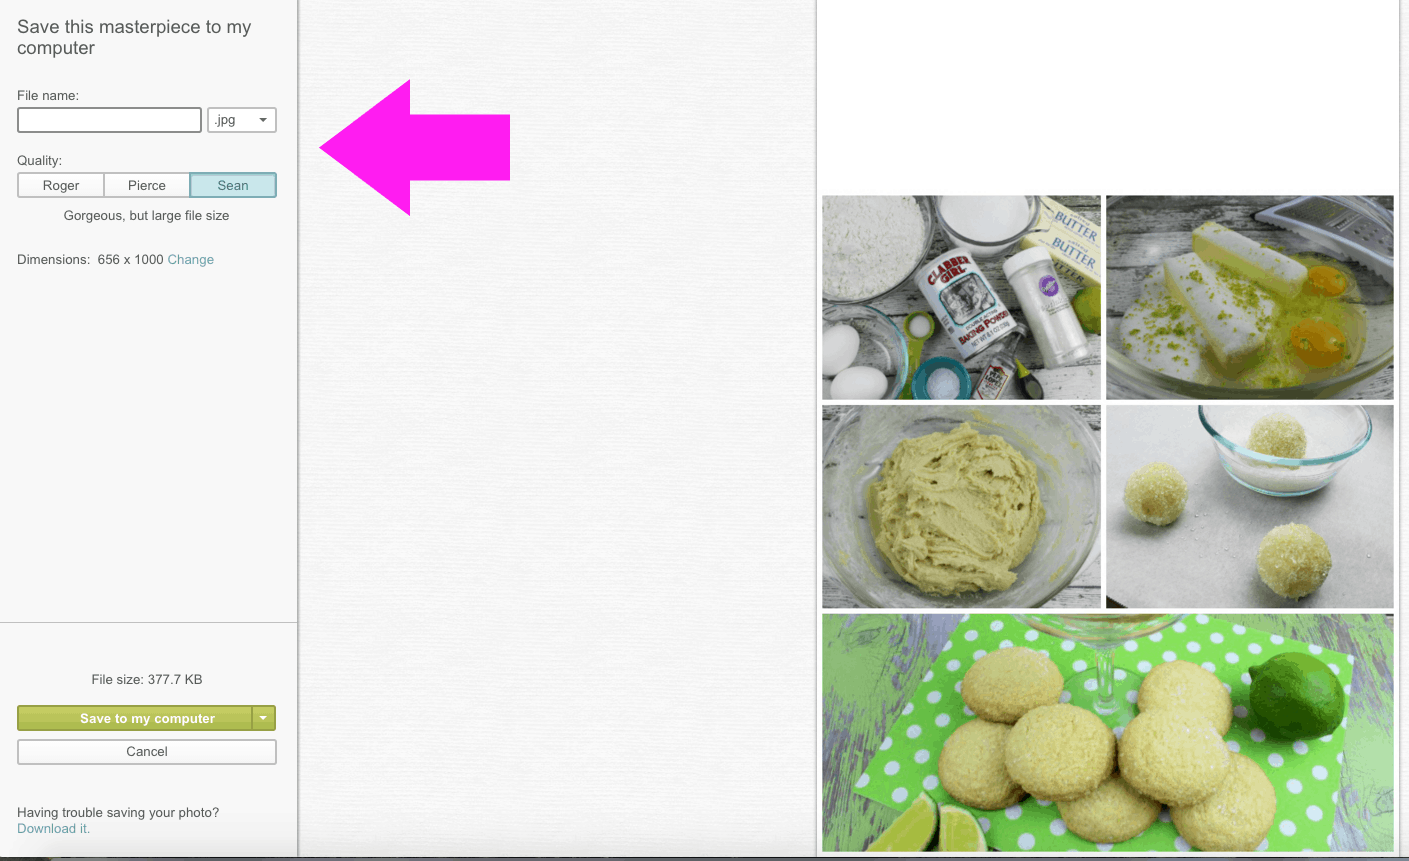
8. Once your collage looks how you want it to, you’re ready to add text. Save it by adding the file name, leaving it as .JPG, and clicking “Sean” so it’s the highest quality. Save using your keywords. “Margarita Lime Cookies” or something similar is the phrase I’d use to save mine.
Note: I’m having you save a copy of the collage how it is now, just in case you hate the text you save or for whatever other reason. It’s always good to have the original. If for some reason you don’t have the original, and you don’t like the text you save it with, just use a rectangular overlay (white) to cover the text up and start over.
Now, onto editing the text.
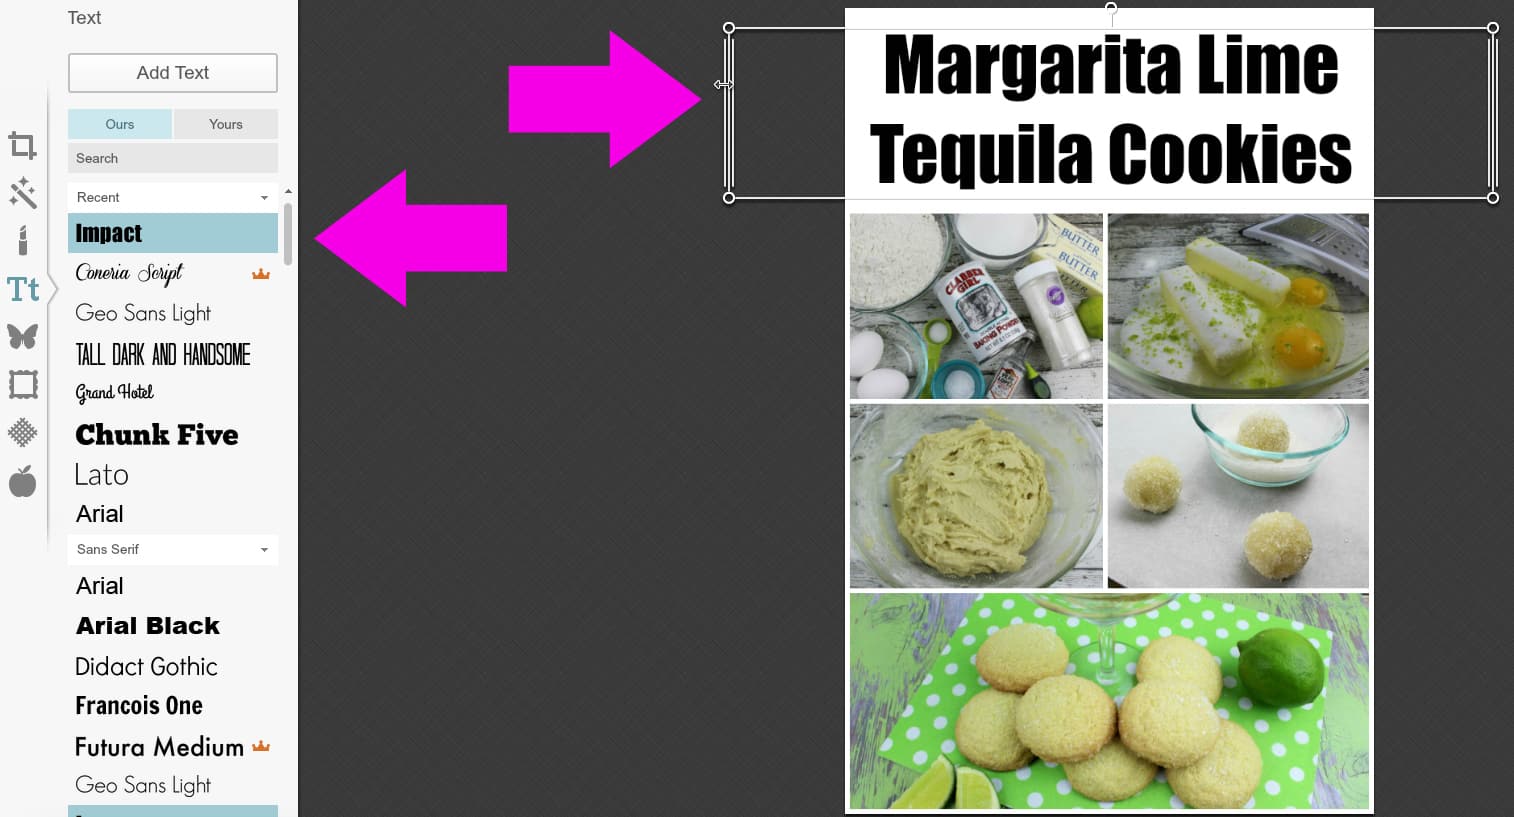
You probably already know how to do this, but just in case, I wanted to show you real quick anyway! The arrow on the left points to the text. Simply click “add text” and choose the font you’d like. The arrow on the right points to the text itself. Drag the ends of the box to the edges of the image, and click “center”. This ensures your text isn’t just centered in the text box – it’ll be centered over the width of the entire image.
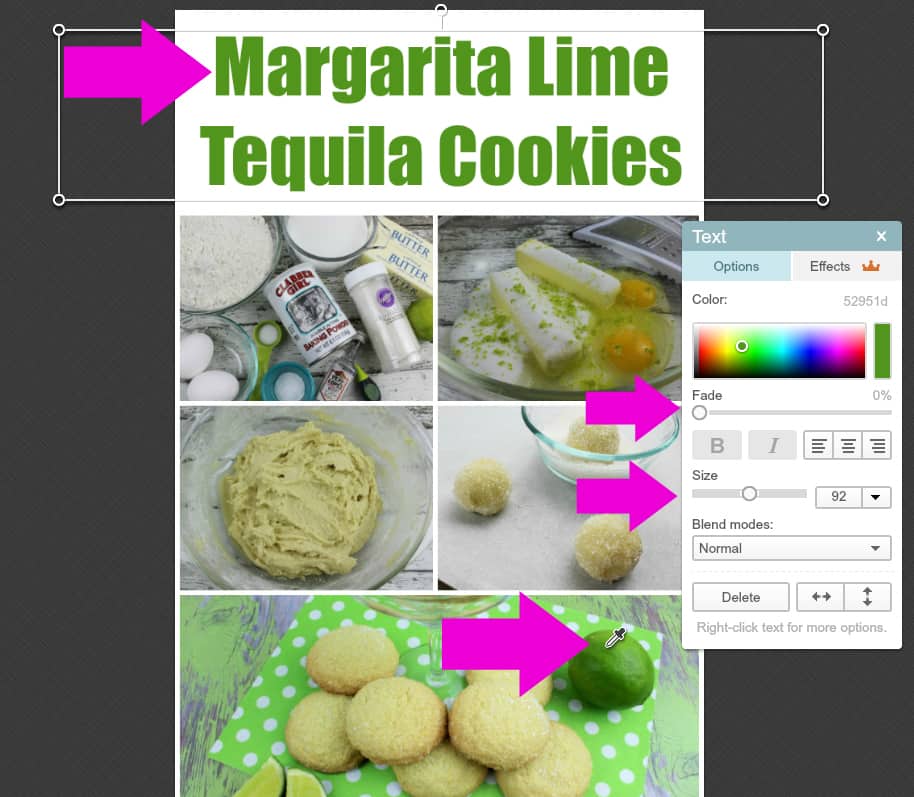
Once you’ve chosen your text, make sure you use the color picker to match the colors up! You can also use “fade”, “size”, and other options to make your collage text perfect. The BIG arrows above point to the color picker, where it’s pointing and then up top it shows the result. It made our font match the lime. The SMALL arrows show how you can choose to fade the text, and increase or decrease the size of the text.

And, here’s the final product! We use long collages on Pinterest because they take up more “real estate”, meaning they stay on the page longer while people are scrolling. This increases the chances of a pin, like, and/or click. Using collages in ALL of your posts will increase the chance by quite a bit, which will in turn increase your Pinterest traffic.
Hope this was very easy for you !!! Thanks so much for coming by this has helped me so much!


I have been using PicMonkey to make my collages for years. It’s pretty simple, so anyone can do it.
I’m pinning this! I never love the way my images look! This a great tutorial! Thank you!! 🙂
This collage looks great! A very good idea when one single picture just isn’t enough.
This is so useful! Thank you for sharing. I prefer to avoid collages though but that is because my niche is photography.
I am so all about PicMonkey! Their editing for photos is so simple and makes everything look amazing. And, I pay the upgrade fee because its so inexpensive and so worth all those extra features! Great tutorial!
Karen | GlamKaren.com
I’ve been using PicMonkey for ages for my pictures, but I know I need to get better about doing vertical images for Pinterest. Thanks for the tips!
I haven’t tried using pic monkey yet, I use canva, but now that I have this tutorial, I’ll give it a spin.
(Please note if this is duplicate–it’s because I was having technical issues.)
This is a great tutorial. I for one appreciate it because I’m still learning how to make quality images that are eye catching.
I’m glad I found your blog today.
Thanks for sharing! I had forgotten all about the collage option in picmonkey and typically just do overlays.
This is such a great tutorial! I love Picmonkey 🙂
Thanks for the info. I never knew how to do this.
Great tips! I love PicMonkey!
This is wonderful. I have to work on Pinterest (and Instagram) this summer and I will keep this in mind. Thanks!
I have a very large love of picmonkey, but I didn’t know a lot of the editing tricks. Guess I’m off to practice! Thanks!
I love PicMonkey! I use them for my blog life and for personal projects at home. Super easy and free! Why not?
How clever is that? I pinned it so I can refer to it again. This has been an issue for me.
Awesome! I’ve been using Canva to make mine, it’s so much less time consuming than Photoshop. Great tips!
Great tips. I need to become more familiar with Pic Monkey.
This is the smartest thing I’ve ever seen. I usually just upload my pictures and don’t like the hassle of trying to change it but this is really easy! Great post! xx felinebykatsairs.com
Great training. I am going to share this
I love PicMonkey! They really make everything so simple. Another free online tool I love is Canva.
Jasmine / http://www.jasminekeclipse.com
This is wonderful information, I’m pinning it in order to follow step by step. Thanks for sharing.
I have tried a few times but I just can not get the hang of pic monkey! I use their editing tool and I love their fonts!
Oh I love a good collage! PicMonkey works really well for me, because I can utilize it for free! When I don’t have an internet connection, though, like on a plane or out of the house, I turn to Lightroom 🙂
I’ve been using picmonkey a lot lately! Love how easy it is to use for pins!
This definitely creates a more interesting image that catches the eye a lot better. Thanks! I had never really thought about changing the images like this. I see the benefit of it.
Picmonkey is the best that is what I make to create collages too. I like the idea of using it for Pinterest as well xx
I’ve read a lot of good reviews about PicMonkey but it’s something that I have yet to try myself. You made working on that collage seem super easy with PicMonkey. I guess I should try it soon and be ready to be wow-ed.
I totally love PicMonkey and it has been such a lifesaver for my blog images! It’s a great site to use for professional and personal photos!
I’ve been using Canva, but I’d like to try using collage pictures. I also don’t like how the site freezes and it at times the photos are the last step for me. I’ll definitely pin this and try it. Thanks!
So handy, thank you! I’ll have to pin this 🙂
http://www.forblueskies.com
This is so helpful! Thanks for sharing with us.
What a great application. It’s so useful.
I’ve always wondered how people got their photos looking so professional. Thanks for the tips. Pic Monkey.
Looks so nice. I’m trying to get back into Pinterest. I always forget about it after every other social media page.
These is great tutorial. I need to do these. Thanks for sharing
This is fantastic! Pinterest is my highest source of traffic, so I am always looking for way to up my game there.
Great tip here! I love PicMonkey!! And I love that you showed how to keep all the colors in line. The fonts and color of the text can really make or break a collage for sure!
I haven’t ever used picmonkey – but I keep hearing great things about it. I only use LR or PS, but should switch over some time to try it out
I will be saving this post for sure. Thanks for the great tutorial!
Pic Monkey definitely makes blogging a lot easier, especially if you want your blog pictures to be easier to share. Thanks for the demo, it looks really easy!
Ive been hesitating on the upgrade to Royale…. but this is the thing that is going to push me over! Thanks so much, I have so many great ideas for this template!
Pinterest has been my number 1 traffic referral for more than 2 years. Probably closer to 3. Great tutorial for anyone that uses pic monkey.
That site is really great! I am using that until now. Glad you shared it!
Great tutorial for those who need it. I however whenever I’m doing my own pics, I just take a vertical shot and use it that way. So much easier.
Great tutorial! I love PicMonkey but don’t have the pay version yet. Maybe later this year 🙂
This is awesome! What a great resource to improve our pics!
I will give Picmonkey a shot. I can use this for so much more!
I need to really try Picmonkey. I currently use canva but no harm in using them both is there?
I love PicMonkey! I have the premium version and it is the best thirty something dollars I spend per year!
I use PicMonkey for just about everything! Whenever there’s something I think they can’t do, they add the feature. Love this tutorial!
Great tutorial, I’ve never tried Pic-monkey but I need to.
This is such a great tutorial! I’ve never tried using PicMonkey. Thank you for sharing!
Great tutorial! I have photoshop so don’t use picmonkey much but love that it has templates! Easy peasy!
I love this tutorial! You made it very easy for newbies to follow. I love picmonkey for collages and most of my other photo editing.
What a great idea! I love picmonkey but have never made a collage before. I am going to have to look for that next time I need a long image!
This is great information! Thanks a bunch!!
Before I put photoshop on my computer I used to use picmonkey all the time! So simple to use!
Loved the final product, ill put these tips to good use! thanks for sharing!
Great info! I’ve used Photoshop for years, but now I can try Picmonkey.
I love picmonkey, been using them for years now. Great tutorial, as a matter of fact, your tutorials have helped me in the past!
Wow I would love to try PicMonkey thanks for sharing
I love pic monkey and i use it all the time!. So simple and fun to use nopt complicated at all. It makes photo editing fun and simple.
Pic monkey is a great tool for making collages and designs. I love that its free too!
I have never tried Picmonkey before. Thanks for the great tutorial. I will have to check it out.
I used to use PicMonkey but I now use another app. It’s pretty good and I never knew it could help grow Pinterest traffic. My Pinterest following is really not that big so I’m gonna go ahead and apply what you taught here. Hopefully it works for me.
I’ve made collages with pic monkey before. Your tutorial is helpful though because I didn’t know all of this.